Tally Prime Integration: How to Connect a Cloud-Based Invoice Application Using a Desktop Agent
Learn how to connect a cloud-based invoice application to Tally Prime using a Windows desktop agent. This guide covers the architecture, Tally HTTP/XML setup, Node.js integration, invoice-to-voucher mapping, error handling, testing and security.
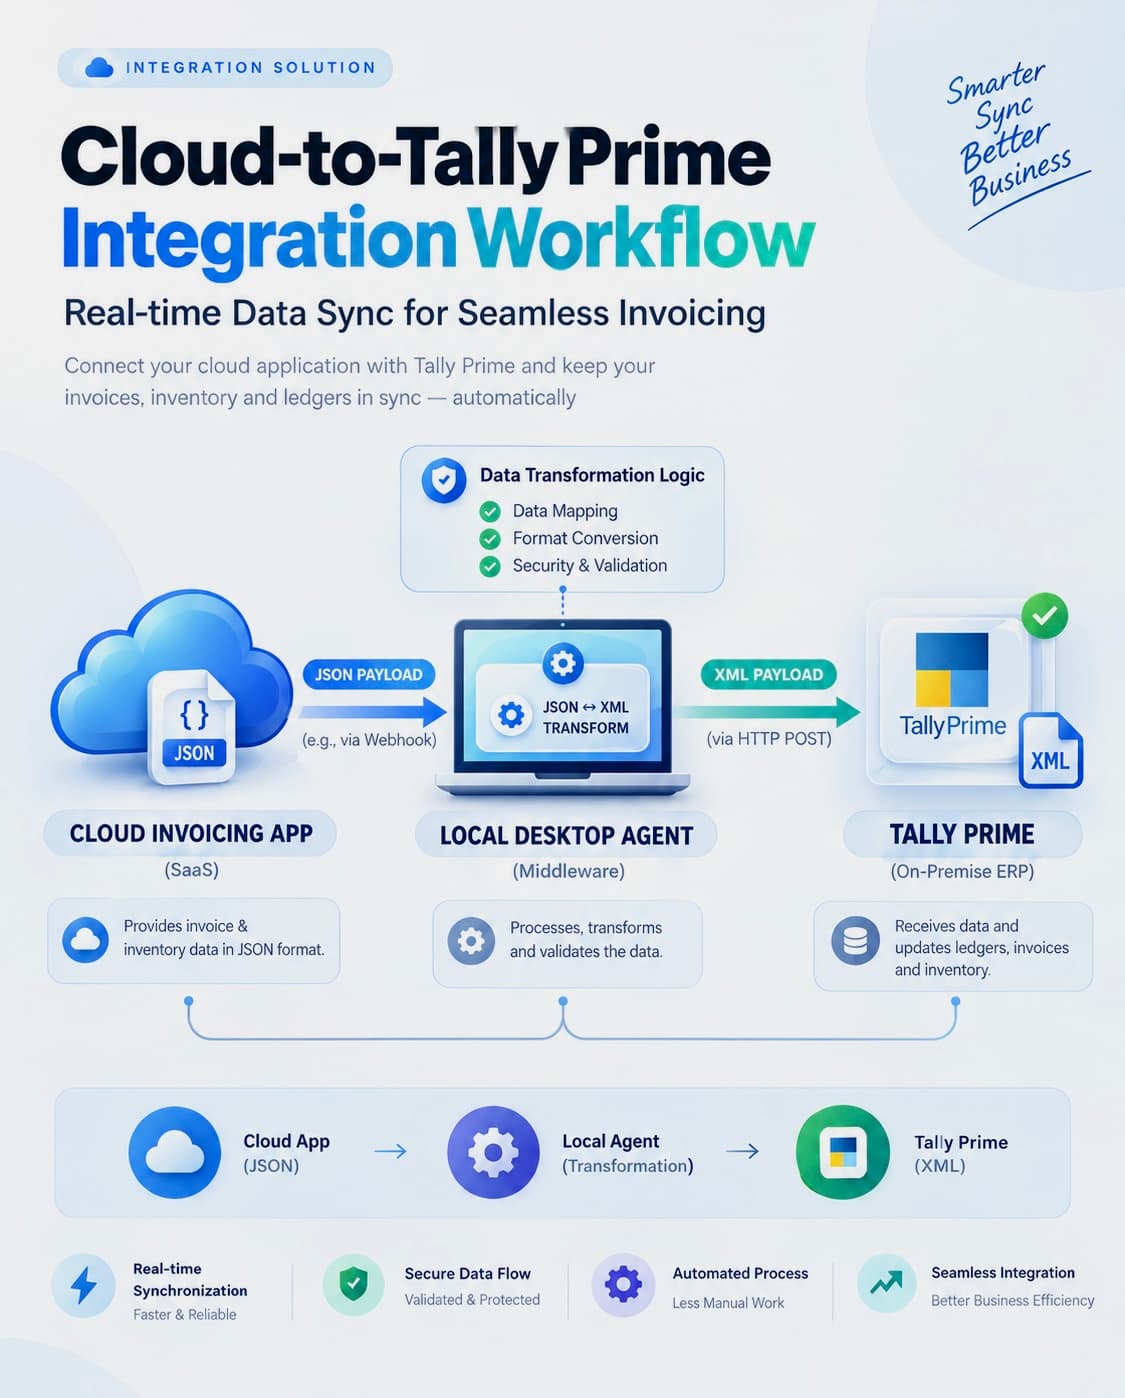
Modern businesses increasingly use cloud-based invoicing and ERP applications to manage invoices, customers, inventory, and financial operations. However, many businesses still rely on Tally Prime, which is installed and operated locally on a Windows computer. That makes Tally Prime integration with cloud software a common challenge: how can a cloud-based invoice application communicate with Tally Prime installed on a local computer?
One practical approach is to build a Windows desktop agent that acts as a bridge between the cloud application and Tally Prime. This architecture allows an online invoicing system to send invoice data to a local Tally installation without requiring the cloud server to connect directly to the customer's computer.
In this guide, we will explore the architecture, technologies, configuration requirements, and implementation steps involved in Tally Prime cloud integration for an invoicing application, from Tally XML integration to reliable Tally invoice sync.
What Is Tally Prime Integration?
Tally Prime integration allows an external application to exchange business and accounting data with Tally Prime.
Depending on the requirements, an integration can support:
- Creating sales invoices or vouchers in Tally.
- Synchronizing customer and ledger information.
- Transferring invoice and transaction data.
- Retrieving accounting information.
- Reducing manual data entry between applications.
TallyPrime supports integration through XML over HTTP, and additional integration approaches may be available depending on the required functionality and configuration.
Official documentation: TallyPrime XML Integration.
Why Connect Tally Prime to a Cloud-Based Invoice Application?
Imagine a business that uses a cloud-based invoicing application to create invoices. Its accounting team uses Tally Prime on a Windows computer to maintain accounting records.
Without integration, employees may need to enter the same invoice information into both systems. This increases repetitive work and introduces data-entry errors.
With an automated integration, the workflow can be simplified:
- An employee creates an invoice in the cloud application.
- The cloud backend stores the invoice and creates a synchronization job.
- A desktop agent running on the Windows computer retrieves the job.
- The agent converts the invoice data into a Tally-compatible request.
- Tally Prime processes the request and creates the corresponding voucher.
- The agent reports the result to the cloud application.
The cloud application can then display whether the invoice was synchronized successfully or requires attention. This kind of workflow is a core part of modern business app development, where cloud tools need to work alongside software a team already depends on.
Understanding the Tally Integration Architecture
The main challenge is that the cloud backend and Tally Prime run in different environments. The cloud application runs on a remote server, while Tally Prime runs on the customer's local Windows computer.
A desktop agent provides the communication bridge between these environments:
Cloud Invoice Application → Node.js Backend → Desktop Agent → Tally Prime → Tally Company
The architecture contains four main components.
1. Cloud Invoice Application
The cloud application provides the user interface for creating and managing invoices. It can be developed using React or another suitable frontend framework.
Its responsibilities include:
- Collecting customer and invoice information.
- Managing invoice items, quantities, rates, and taxes.
- Calculating invoice totals.
- Saving invoices in the cloud database.
- Allowing users to request synchronization with Tally.
- Displaying synchronization status.
2. Cloud Backend API
A Node.js and Express backend can manage invoice storage, authentication, device registration, and synchronization jobs. MongoDB can be used to store invoices, connected devices, and synchronization records.
When an invoice is ready to be transferred to Tally, the backend creates a synchronization job and makes it available to an authorized desktop agent. Designing this layer well is the heart of reliable backend and cloud development.
3. Windows Desktop Agent
The desktop agent runs on the same Windows computer as Tally Prime, or on a computer that can securely reach the relevant Tally instance. It communicates with the cloud backend using HTTPS and with Tally Prime using its configured local integration interface.
The agent is responsible for:
- Connecting to the cloud backend.
- Checking Tally Prime connectivity.
- Retrieving pending invoices.
- Converting invoice data into the required XML format.
- Sending requests to Tally Prime.
- Processing responses and reporting results.
- Logging errors and supporting retries.
A technology such as Electron with Node.js can be used to build the desktop application and package it as a Windows installer.
4. Tally Prime
Tally Prime receives the integration request and processes the data according to its supported import and voucher-creation mechanisms.
The relevant company must be loaded, and the required accounting masters must be available or handled according to the integration's defined rules. The desktop agent then reports the result to the cloud backend.
How Does the Cloud Application Communicate with Tally Prime?
A common question is why the cloud application cannot simply send an HTTP request directly to Tally Prime. The issue is the network boundary.
An application hosted on a cloud server generally cannot access localhost on a customer's computer. On the cloud server, localhost refers to the cloud server itself, not the customer's Windows machine.
A desktop agent solves this problem by initiating communication with the cloud backend. The communication flow works as follows:
- Create an invoice: The user creates an invoice in the cloud application.
- Create a synchronization job: The backend validates and stores the invoice, then marks it as pending synchronization.
- Retrieve the invoice: The desktop agent periodically checks the backend for pending synchronization jobs.
- Convert the data: The agent maps the invoice fields into a Tally-compatible XML request.
- Send the request to Tally: The agent sends an HTTP POST request to the configured local Tally endpoint.
- Process the response: Tally Prime returns a response that the agent parses to determine whether the voucher was imported successfully.
- Update the cloud application: The agent sends the result to the cloud backend, which updates the invoice's synchronization status.
This approach avoids requiring the cloud server to initiate a direct connection into the customer's local computer.
How to Configure Tally Prime for Integration
Before testing the desktop agent, Tally Prime must be configured to accept integration requests. The exact menu names may vary by version, so refer to the official TallyPrime documentation for the installed version.
Step 1: Start Tally Prime
Install and open Tally Prime on the Windows computer where the desktop agent will run.
Step 2: Open the Required Company
Select and load the Tally company into which invoices should be created. A company must be loaded for the integration to operate against the intended accounting data.
Step 3: Enable the HTTP Server
Configure the relevant TallyPrime integration settings to enable its HTTP server. The commonly used default port is 9000, although the actual port should be confirmed from the local configuration.
Step 4: Confirm the Local Endpoint
A typical local endpoint is http://127.0.0.1:9000. The desktop agent can use this endpoint when running on the same computer as Tally Prime.
The endpoint and port should be configurable rather than hardcoded throughout the application.
Step 5: Verify the Connection
Before attempting to create an invoice, send a suitable test request and verify that Tally Prime returns a response.
Tally's integration documentation explains the XML request and response structure and how third-party applications communicate with the local HTTP interface. Official guide: Prerequisites for TallyPrime Integrations.
Important: Keep the local Tally endpoint protected by appropriate network controls. Do not expose it directly to the public internet.
How to Build a Tally Desktop Agent for Windows
The desktop agent can be developed using Electron, React, and Node.js. Electron provides a way to package a desktop application for Windows, while Node.js can handle API communication and the local Tally integration.
The agent can provide a simple interface showing:
- Cloud connection status.
- Tally Prime connection status.
- Selected Tally company.
- Number of pending invoices.
- Number of successfully synchronized invoices.
- Last synchronization time.
- Recent errors.
It should also provide actions such as Test Tally Connection, Test Cloud Connection, and Sync Now.
Once development and testing are complete, Electron Builder or another appropriate packaging tool can generate a Windows installer, such as TallyBridgeSetup.exe. The installer should include the application files and necessary dependencies. Tally Prime itself remains a separate installation.
How to Integrate Node.js with Tally Prime
The Node.js service inside the desktop agent can communicate with Tally Prime using HTTP and XML. A Node.js Tally integration typically involves these steps:
- Validate the incoming invoice data.
- Identify the target Tally company.
- Map customer and invoice fields to the appropriate Tally voucher fields.
- Generate the required XML request.
- Send the request to the configured local Tally endpoint.
- Parse the returned XML response.
- Determine whether the voucher was successfully imported.
- Return a structured result to the cloud backend.
Tally's XML interface uses an envelope structure containing header and body information. The exact XML required for a sales voucher must be based on Tally's supported import format and tested against the target TallyPrime version.
Reference: TallyPrime XML Integration.
Example of the Node.js Communication Layer
The following is a simplified connectivity example, not a complete invoice-creation implementation.
const axios = require("axios");

async function sendXmlToTally(xmlPayload) {
  const tallyUrl = process.env.TALLY_URL || "http://127.0.0.1:9000";

  const response = await axios.post(tallyUrl, xmlPayload, {
    headers: {
      "Content-Type": "text/xml; charset=utf-8",
    },
    timeout: 15000,
  });

  return response.data;
}

module.exports = { sendXmlToTally };
This example demonstrates the HTTP communication layer. A working integration must also generate the correct Tally XML, parse the response, validate the imported voucher, and handle errors.
How to Map Cloud Invoices to Tally Vouchers
A cloud invoice and a Tally sales voucher may represent the same business transaction, but their data structures are not necessarily identical. A mapping layer should translate the cloud application's invoice fields into the corresponding Tally fields.
For example:
- Invoice number → Voucher number
- Invoice date → Voucher date
- Customer name → Customer ledger
- Product or service → Appropriate ledger or stock item
- Quantity → Quantity, where applicable
- Rate → Rate or applicable amount
- Tax → Appropriate tax ledger and calculation
- Grand total → Voucher amount and balancing
The correct mapping depends on the business's accounting configuration.
For a basic demo, use a test company with the required customer ledger, sales ledger, stock items where applicable, and tax ledgers.
Do not assume that creating a voucher will automatically create every missing ledger or inventory master.
Important Considerations for Oman-Based Businesses
For businesses operating in Oman, the integration should also account for the configured currency, applicable tax treatment, invoice numbering rules, and the company's accounting setup.
Tax handling should be verified with the business's accountant and the actual Tally company configuration. Do not assume that every invoice should use the same tax rate or ledger.
How to Handle Synchronization Errors
A reliable integration must track the result of every synchronization attempt. Useful invoice synchronization states include:
- Pending: Waiting to be processed.
- Processing: Currently being sent to Tally.
- Synced: The import was confirmed successful.
- Failed: The operation failed and requires investigation or retry.
The system should store useful diagnostic information, including the invoice ID, synchronization attempt count, timestamp, and relevant Tally response.
It should also prevent duplicate voucher creation when the agent retries after a network interruption. A cloud invoice ID can help identify the transaction, but the integration must implement an effective duplicate-detection strategy, because a timeout does not necessarily mean Tally failed to import the voucher.
How to Test the Complete Tally Prime Integration
Use a dedicated test company before working with real accounting data. Follow this checklist:
- Start Tally Prime and load the test company.
- Confirm that the local HTTP integration endpoint is available.
- Start the cloud backend and database.
- Launch the desktop agent on the Windows computer.
- Verify the cloud and Tally connection statuses.
- Create a sample invoice in the cloud application.
- Send the invoice to the synchronization queue.
- Confirm that the desktop agent receives the invoice.
- Verify that the agent sends the expected XML request.
- Confirm that Tally Prime imports the sales voucher.
- Inspect the voucher inside Tally Prime.
- Verify that the cloud application receives and displays the correct synchronization result.
- Test failure scenarios, including Tally being unavailable, missing ledgers, and interrupted network connections.
- Confirm that retries do not create duplicate vouchers.
The integration should be considered successful only when the voucher is verified in Tally Prime and the cloud application records the correct outcome.
Security Best Practices
Because the system handles financial information, security should be part of the design from the beginning.
- Use HTTPS for communication between the desktop agent and the cloud backend.
- Authenticate and authorize each registered desktop agent.
- Store device credentials securely.
- Validate invoice data before processing it.
- Restrict access to the local Tally endpoint.
- Avoid logging secrets or unnecessary customer information.
- Implement retry controls and duplicate prevention.
- Keep an audit trail of synchronization attempts and results.
The desktop agent should initiate communication with the cloud backend rather than exposing the customer's computer to unsolicited public connections.
Benefits of Using a Desktop Agent for Tally Integration
A desktop-agent architecture offers several practical advantages:
- Connects cloud and local systems: It bridges a remote application and locally installed accounting software.
- Reduces repetitive work: Invoice information can be transferred without re-entering every field manually.
- Supports controlled synchronization: The agent can track pending, successful, and failed operations.
- Allows local communication: Tally requests can be sent from the customer's computer without requiring the cloud server to access the local endpoint.
- Supports future expansion: Once the basic flow works, the same architecture can be extended to support additional voucher types, ledger synchronization, and other accounting workflows.
The exact features supported will depend on the integration implementation and the target TallyPrime configuration. The same pattern also fits wider AI agents and automation projects that need to reach software running on a local machine.
Conclusion
Integrating Tally Prime with a cloud-based invoice application requires a clear communication architecture between the cloud environment and the local accounting system.
A practical approach is to use a React-based cloud interface, a Node.js backend, a synchronization queue, and a Windows desktop agent that communicates with Tally Prime through its supported local integration interface.
The most important step is to prove the complete invoice flow in a test environment before connecting the integration to an existing production application.
Once the desktop agent can receive an invoice from the cloud, create the corresponding voucher in Tally Prime, and report the confirmed result back to the cloud, the foundation for a more complete integration is in place.
Planning to connect your invoicing, ERP or SaaS product with Tally Prime? Get a free consultation and let's map out the right integration for your business.
Official References
Frequently asked questions
Can Tally Prime be integrated with a cloud-based invoice application?
Yes. TallyPrime supports integration with external applications using supported interfaces such as XML over HTTP. A desktop agent can bridge a cloud backend and a local Tally installation.
Why is a Windows desktop agent required for Tally Prime integration?
The agent runs within the local environment and can reach Tally Prime's local endpoint. It also communicates with the cloud backend to retrieve invoices and report synchronization results.
Can Node.js communicate with Tally Prime?
Yes. Node.js can send HTTP requests containing Tally-compatible XML to a reachable TallyPrime integration endpoint.
Does the desktop agent need to be installed on the same computer as Tally Prime?
That is the simplest configuration. An agent on another computer may work if it can securely reach the Tally instance over the network and the relevant settings permit it.
Can the integration automatically create invoices in Tally Prime?
Yes, provided the request uses the correct voucher format, the required masters and company are available, and Tally accepts the transaction. The integration must verify the response and handle failures.
Can the desktop agent be distributed as an EXE installer?
Yes. A framework such as Electron can package the agent as a Windows installer. Tally Prime must still be installed and configured separately.
Does Tally Prime need to be running during synchronization?
For this local HTTP-based approach, Tally Prime must be running and its integration endpoint must be available when the agent sends the request.
Is this Tally integration architecture suitable for production?
It can be, but production use requires stronger device authentication, secure communication, duplicate prevention, monitoring, accounting validation, and thorough testing with the target TallyPrime version and company configuration.
Written by Fasil M
Freelance full stack and AI developer with 2+ years of experience building SaaS products, business apps and community apps for clients worldwide.